
Playing With My Flashlight…New Light Painting
December 8, 2014 § 14 Comments

“Booze & Ice Cubes Composite”
I decided to play around with my little Streamlight Stylus flashlight again. I haven’t used it in a while, concentrating more on available light, or most recently my Alien Bee strobes. The cool thing about light painting is the fact that you really never get 2 exposures that are 100% exactly the same. With practice, you can come really close, but usually(never) exact. The cool thing about that is it makes every exposure exciting! Now with Photoshop, you can blend a couple of images together and by masking, you can paint out or in what parts of each exposures you want to show or hide. I did this with the 1st booze and ice cube shot. I included both original images so you can see how I composited the different ice cubes. The 2nd booze shot shows the original cubes, but I added color and a vignette to the background. If you look at most of my booze images on my website, you’ll see more natural colors, but I thought I’d go a little wild here for the fun of it. All of these images were shot on a black background. With the old saws, I added my old barn door that I used on the “horse trainer” shot a couple of weeks ago. With the tennis rackets(maybe they’re badminton rackets…I don’t know for sure :D) I just left it black. The rest of the booze shots and the Christmas bulbs, I painted in some color. My favorite thing about light painting, is the ability to place light anywhere you want it. For instance, you can see instantaneous changes on the rackets which would be really hard to achieve with strobes. On the saw image, that back rusty saw has a beam of light across it. Sure you could set up another light with a small snoot on it, but all I had to do is sweep my flashlight across the area…no set-up, and it took all of a couple of seconds. The ice cubes presented the most difficult, or exciting situation…depending on how you want to view it(I choose exciting) since every little movement can make dramatic changes since there are so many curves, dents, ridges, etc. on each cube. You do wind up with some specular highlights, that I find annoying, so I just remove them in Photoshop. Anyhow, I thought I’d share my latest light paintings with you…hope you enjoy them.

“Booze & Ice Cubes…Original Cubes”

“Original Booze & Cubes 1”

“Original Booze & Cubes 2”

“Original Christmas Bulbs”

“Christmas Bulbs Final”

“Old Tennis or Badminton Rackets”

“Old Saws”
Thanks again!
Workin’ The Portrait
November 17, 2014 § 14 Comments
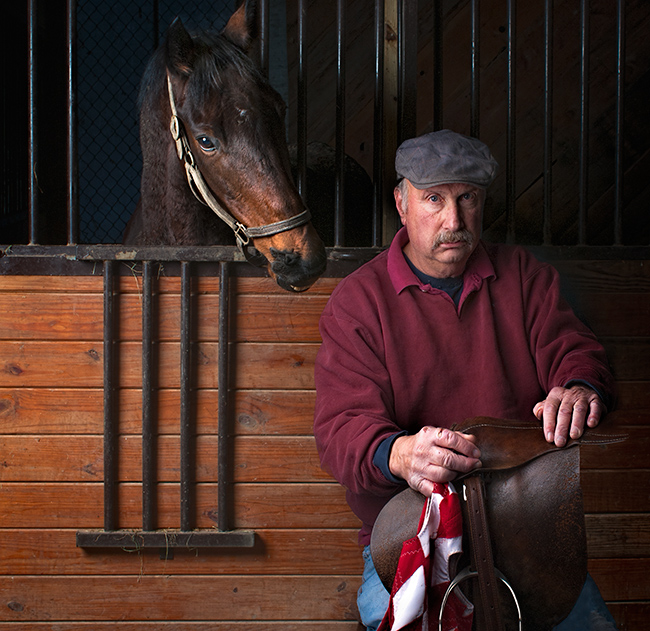
“The Horse Trainer”
I was going to call this “Rockin'” The Portrait, a word used by the young and hip, but my “young and hip days” are a thing of the past, so I went with “Workin'” since that’s what I’ve been doing for a long long time! The reason for choosing “Workin'” and not “Shootin'” is because of the post production work that went into these images. I used to shoot more portraits back in the 80’s, along with my still life work, but they were straight photographs…pre Photoshop…and mainly b&w. I’ll include an ad I did back in 1987 of my portrait work. Anyhow, recently I stumbled upon the magnificent portrait work of Regina Pagels from Utah. Her work is simple yet stunning, and her lighting is simply beautiful. Google her and see for yourself! After looking at her work, I decided to do a simple studio portrait of my brother-in-law John Edward. John Edward’s a horse trainer, who trains my wife’s horses at the present time. I photographed him against a simple dark background holding a couple of the tools that a horse trainer would use…kinda like what I did in the 80’s where my father who was a bricklayer held a brick hammer, my boss Ed Nano, leaned on a view camera, etc. After shooting John Edward, I decided to add a couple of different backgrounds in Photoshop to form composite images. The one thing I kept in mind, was the quality and direction of the light, so I used the same soft side light on the backgrounds as I did on my brother-in-law. I’m showing the simple portrait, along with the backgrounds separately so you can see the before and after images. I’m also including a portrait I did a few years ago of a model, Brian, who posed as a “gangsta” also against a black background. I added a few separate gritty style backgrounds and positioned him on them. The problem with Brian, was I cropped tight on camera, so I had to crop just as tight with the new backgrounds, thus eliminating some interesting areas of the backgrounds. My advice to anyone trying this is to get the whole subject in the frame, and crop later. So here’s the images, hope you enjoy!

“John Edward Original”

“Birdy In The Background”

“Horse Trainer 2”

“Barn Door Background”

“Brian Original”

“Gritty Background 1”

“Gangsta 1”

“Gritty Background 2”

“Gangsta 2”

“Ad Circa 1987”
Thanks for looking!
Time To Relax, Reflect, and Recharge!
October 27, 2014 § 10 Comments

“Walking Bridge”
One of my favorite things to do is walk around and shoot pictures. It doesn’t matter if it’s rural, urban, with people or without, but heading out of the studio, sans lights, stands, reflectors etc. is a great way for me to “relax, reflect, and recharge”. Shooting scenics, especially in the fall with all of those gorgeous colors has always been a favorite of mine…and I’m sure I’m not alone. My last blog was about trying to achieve a “painterly” look, and although it’s nice to have tools at hand that can help me achieve that look, if that’s what a client wants, I’m a photographer and not a painter. A number of comments I got, were from photographers that said I should “get it right, in the camera”. I used to do that when I shot transparencies with my old film cameras, actually, you really didn’t have a choice…if you didn’t get it in the camera, you didn’t get it. Transparencies were pretty unforgiving. You could bracket your butt off, but film and processing cost a lot of money, so you had to be right on when your film came back from the lab. With digital, I can set my camera so I get perfect color, sharpness, tones, and exposure…at least perfect according to the camera, but I shoot raw and make those decisions myself back at my “digital darkroom”, namely my computer. I like to sit in front of my computer and decide what I want the finished image to look like. Some people may love what I do, some may hate it, but as long as I’m happy with my results, I consider the image a success. As far as these images are concerned, I used Photoshop on all of them, and some tools from OnOne and Topaz on all of them as well. A couple such as the 1st image of the walking bridge, and the 2 water scences, I shot multiple images and combined them in Photomatix for a tone mapping effect. On the walking bridge, when I exposed for the grass and trees, part of the bridge went black, and if I exposed for the bridge and the area where I was standing, the far grassy area got washed out. On the water scenes, the sun was really glaring off the water, and some of the land areas would ge black if I exposed for the water, so again, tone mapping let me get some of everything. I do re-introduce some shadows back into the image, because shadows do exist in real life…it’s just that our eyes just seamlessly compensate which a camera can’t do in one shot. I included a couple of the original “out of the camera” images so you can get a before and after idea. Enough talk, let’s look at some pictures!

“Leaves on Tree Trunk”

“Leaves on Tree Trunk Original”

“Dead Tree”

“Dead Tree Original”

“Stream”

“Stream Original”

“Sulpher Springs”

“Sulpher Springs Original”

“Trees and Meadow”

“Trees and Meadow Original”

“Wild Grass”

“Wild Grass Original”
I’ll finish off with a couple more “processed” images

“Sulpher Springs 2”

“Along the Road in South Chagrin”

“Quarry Rock”

“My Yard”

“My Yard Too”
Thanks for checking me out!
“Painting” With My “Brushes and Canvas”
October 13, 2014 § 8 Comments

“Paintings 1”
Recently, Topaz, one of my favorite Photoshop plug-ins introduced a product named “Impressions” which would enable a photographer to upload an image, press a button and turn that image into a “Monet”, “Van Gogh”, “Cezanne”, or any number of other presets. What’s cool about this product, is that you have the ability to combine, mask out or in, or vary in a number of ways the settings so you can pretty much create your own style. Topaz is a great company with wonderful products, and I’m debating whether to add this one to my arsenal. It’s something that a client might want for a particular assignment, but I don’t think it’s something that I would wind up using all the time. Never the less, I was intrigued enough to grab a handful of my existing images and play! What I basically did was use some of the plugins I normally use to add texture and/or grit to an image and do the opposite…smoothing the image by sliding the sliders in the opposite direction. I then thought about brushing out this “new technique” in some areas so I would have a combination of smooth, gritty or something in-between. As usual, I’m posting the before images, so you can see where I started, and where I ended up. As always, feel free to ask any questions.

“Paintings 1 Original”

“Paintings 2”

“Paintings 2 Original”

“Paintings 3”

“Paintings 3 Original”

“Paintings 4”

“Paintings 4 Original”

“Paintings 5”

“Paintings 5 Original”
Hope you enjoyed this. Excuse me now while I try to find my beret and monocle!
I Lost My Best Friend Today
September 23, 2014 § 12 Comments

“Zeusieboy”
This blog will be different …no behind the scenes, no information on how I did the images, just a tribute to my very best friend. Today started like any other day. Zeus barks to let me know that he has to do his “business”. He walks down to his “favorite place” to poop, and then from a distance I realize he’s in some kind of distress. He’s almost 13 and he’s been getting constipated at times. I thought that might be the case, but he had to sit and rest halfway back to the house. He got back and was really distressed so we called our vet and took him right up. Turns out his stomach “flipped” and he was bloating up before our eyes. I never saw an animal in such distress. The chance that he’d survive a surgery was almost nil because of his age, so we put him to sleep. I mentioned he was my best friend, and I mean it. I once saw a saying on our vet’s wall that said “a dog is the only thing that love’s you more than he loves himself”. I know that was true about my Zeus. Anyhow, I hope you indulge me this bit of sadness. I’m sitting here writing this and thinking it’s getting dark outside and I have to take him out for his evening walk…I’m still in a bit of shock. Let me leave you with a couple of images that were taken in much happier times.

“My Family”

“I miss you old friend”
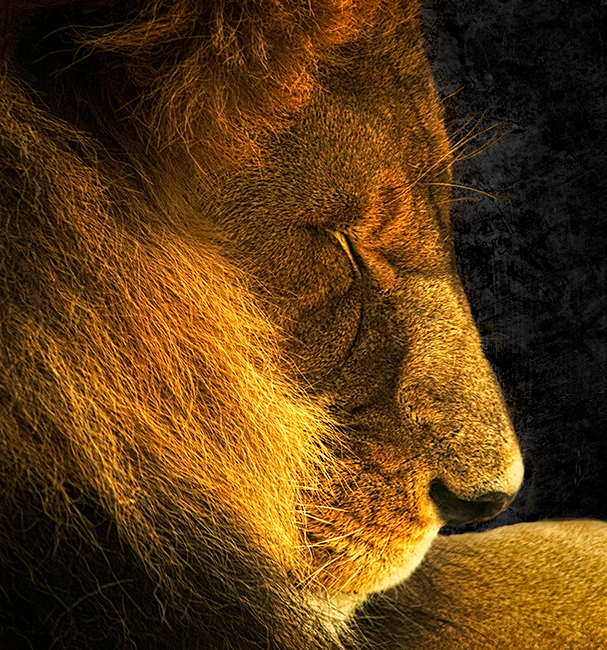
Shooting What I Love!
August 25, 2014 § 2 Comments

“Hello There”
A number of consultants in the world of professional photography are advising photographers to shoot what they love, not what they think a potential client might want to see…great advice! I love shooting a lot of different things. When I first started out, I, like a lot of people, shot scenics while on vacations, or in my case, bumming around the country with a couple of friends. We went to a lot of our National Parks, and I got some nice shots of scenics and wildlife. Eventually I went to art school and studied studio lighting…and shot still life images almost exclusively. I think I’m a pretty good still life shooter, but truth be told, if I could make a living shooting only available light, I’d pack my strobes away forever. I do love shooting portraits though, and combining that with my love of shooting nature with available light, got me around to shooting portraits of animals. I’ve been shooting animal portraits for many years, and just last week, I asked my son if he’d like to head to the Cleveland Zoo to do some shooting. We went on a particularly hot humid day, so I didn’t last too long. Also, when it’s that hot, a lot of the animals aren’t all that active, so I plan on going back in a few weeks to resume my “Zoo Portrait” series…stay tuned. I sometimes stand around for a long time just waiting for my subject to look a certain way, or strike a certain pose…it’s not like I can tell them what to do, so it’s just a matter of being patient, and being ready for whatever happens. I like to separate my subject from the cluttered background and do a composite on my favorite dark slate background. I included the original image of a Meerkat to show what I have to start with. All of the other animals have similarly busy backgrounds. I use my favorite software programs…Topaz and OnOne to bring out textures and color, and Photoshop to strip out the subject and position it on my dark background. Getting back to my opening, as much as I love shooting in the studio, give me my DLSR, and a zoo full of interesting animals, and I’ll be “as happy as a pig in…” well, you know what I mean!

“Got a Cracker?…I Don’t Pose For Free Ya Know!”

“Say What?”

“Meerkat Original”

“Boy My Feet Get Tired Posing For These People”

“Hey, Remember When…Oh Never Mind”
“Zzzzzzzzz”
Any questions? Feel free to ask…and thanks for looking!
Back To Black and White
July 21, 2014 § 4 Comments

“Flowers 1”
I learned about b&w film and processing back at the Cooper School of Art where I studied commercial photography. This was back in the late 70’s, and I continued to shoot b&w for years after. Now with digital, I shoot everything in color and convert some of the images to b&w. For the longest time, I felt that digital b&w’s from color files just didn’t hold up to the good old film days. Now, however, there are some great programs out there enabling a photographer to make fantastic b&w images. I’ve been using OnOne’s “Perfect Black & White” for quite some time. It’s now even better with the newer versions. I know some photographers like Nik Software, but I’ve never used that brand. Anyhow, I’ve talked online with a couple of very well know photographers who feel that b&w is making a comeback in the commercial field. It’s always been a fine art favorite, but now it’s expanding into other areas. I do have a lot of b&w images, but up until now, I kept them in files on my website that weren’t visible to the general public. I’ll be editing down a number of these images and creating newer ones in the next couple of weeks. One of my favorite things to do in b&w are flowers and plants, so I thought I’d start out showing some of those. In the future, I’ll post some b&w images of cars, scenics and buildings…maybe even some people shots. I added some borders on these images…I think it adds a little bit extra. Hope you like them!

“Flowers 2”

“Ferns”

“Flowers 3”

“Flowers 4”

“Flowers 5”
Thanks…any questions on how I did them, feel free to ask!
Welcome Home LeBron
July 12, 2014 § Leave a comment

“The LeBron Sign”
I shot this 4 years ago. This sign covered a whole building in downtown Cleveland. I never realized how big it was until I went to photograph it. I didn’t plan on shooting this picture, but after a few days, I thought I’d run downtown and shoot it. Cleveland pretty much wanted all reminders of LeBron gone, and the quicker the better. I was pissed especially when I watched “The Decision” on ESPN. I really thought I had missed my chance to get this shot since I had waited a few days. I went down on a Sunday morning with my son. There was a handful of people standing around watching as the workers were working to bring the sign/banner down. As luck would have it, I got the perfect shot. What amazed me was how small the workers were in relation to the sign. Anyhow, I got the shot, put it in my portfolio and website, and pretty much forgot about it…until today. I’m thrilled! My dislike of LeBron dissipated over the years. He became just another athlete who left here for more money elsewhere. “The Decision” eventually faded into the back recesses of my mind along with “The Drive”, “The Fumble”, “The Shot”, “Red Right 88”, and probably a few more. Let’s just say that it’s extremely tough being a Cleveland sports fan. I’m 64 years old and the last time Cleveland had a championship was the Browns winning the NFL Championship in 1964…when I was 14! Hell, this was before the Super Bowl was even thought of. The Cavs came close, but never won it all. The Indians last won in ’48 when I was -2! I’m a big Ohio State fan, and they were undisputed, undefeated National Champs when I was 18. The next time that happened I was 52. I was beginning to believe that Cleveland would not win another championship in my lifetime, but now I have renewed hope. I read LeBron’s letter in Sports Illustrated today, and he said all the right things. My son thinks I’m wrong, and so far he hasn’t forgotten or forgiven, but then he hasn’t gone through as long a “drought” as his poor dad has. So here’s my shot, and if they decide to put another sign up someday…preferably after a championship celebration, I’ll be down there shooting!
Happy Birthday America
July 4, 2014 § 2 Comments

“Happy Birthday”
I’m watching “John Adams” on one of the cable stations as I write this. I’m recognizing some of the scenes because I was there a few times…Colonial Williamsburg, Virginia. The gentleman in my image was the “greeter” all the times we were there. He never broke character and spoke to us visitors as if it was the 1700’s. I remember listening to the various people telling us about how a group of mostly young people decided to, at the risk of death, start a new country. After all of these years, I still get nervous when I’m about to start a new assignment, and I’ve never yet had an art director threaten to kill me…at least not out loud! Anyhow, the technical part of this job is a simple composite…the Williamsburg greeter, I’ve explained. The background is a shot of the flag blowing in the breeze while attached to a government building in Washington D.C. I used post-processing to bring out the texture a bit. So, again, Happy Birthday America, and to all of you out there, I hope you have a great 4th, rest up, and then go out there and create something great.
I’M OUTTA’ HERE!…OUTSIDE THAT IS
June 30, 2014 § Leave a comment

“Frohring Meadows 1”
My last few blogs have been about lighting things in a studio. I’ve shot some images with natural light, some with strobe, and some using a small flashlight while doing a technique called “light painting”. This post is about shooting outdoors using natural light. This is how I started. No different than most people…get a camera, go outside and shoot pictures. Pretty easy with digital to go out and shoot a ton of shots and come away with some pretty damn good images. Back in the film days, there were times I’m sure where you got your film developed and had some pretty terrible results. If you go way back to one of my previous blogs, you can read about how I travelled around the country with my camera set on the same shutter speed and f-stop no matter what the lighting conditions…no “auto anything” on my camera back then. I guess you can say that I had my camera set on “auto dummy”, but I’ll stop there. Anyhow, with the great cameras we have today, and the ability to go out and shoot a ton of images using a memory card instead of expensive rolls of film, there’s no reason, not to go out and shoot, shoot, and shoot! We have the ability to experiment, and with Photoshop, we have an even greater chance to do some really cool things. While I was blogging the last couple of months about shooting indoors, I was actually spending more time outdoors shooting for my self and for a client. For myself, I spent some time shooting in one of the local parks near my home. For the client, I shot various companies’ store fronts…great job, shooting natural light, for some great clients! For both, I spent time in Photoshop taking my raw images and enhancing them. I always shoot raw, and while pretty bland out of the camera, I have a greater latitude while post-processing. With some of the store fronts(not the one included here), I even added a different sky since the skies on certain days were pretty blah…this one was nice though, just needed some tweaking. The “job” image here is an outtake, while the others are from my permanent “scenic” files. I’ve included the raw files of each so you can see what I add in post processing, and have the “before and after” images for comparison. As usual, I used Photoshop, and various filters from OnOne Software and Topaz Labs.

“Store Front Outtake”

“Store Front Outtake Original”

“Frohring Meadows 1 Original”

“Frohring Meadows 2”

“Frohring Meadows 2 Original”

“Frohring Meadows 3 Original”

“Frohring Meadows 3”
Once again, hope you enjoy!
